Projects

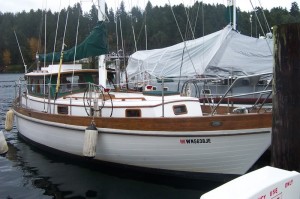
Feature Member Project: Sailboat Restoration

Every month, we feature a project created by a different Vancouver Tool Library member. This month, we’re talking to Scott and Kim, who worked on two projects this summer: cedar planter boxes for their backyard and the restoration of their boat. They have been kind enough to share with us how the VTL’s tool inventory helped them with these endeavours.

Tell us about how your project helped you start growing your own food in your backyard.

We’ve been wanting to grow our own veggies for some time and were finally motivated after moving into a place with a lovely, sizable, south-facing deck. After researching many different planter designs (we also find the book library quite useful), we drew up plans for some substantial planters for our garden.  The father of a friend of ours runs a cedar processing plant and he graciously donated some beautiful cedar planks to the cause. With that, we were away. We were building six of the 2’x4′ planters, and rather than build them slowly one at a time, we decided to just get on with it and build them assembly-line style using VTL tools!  Tools were everywhere: planks were first cut using the library’s sliding mitre-saw, drilled using the drill-press, and finished off with a skill saw for the base. To boot, all the work was supported on saw horses from the VTL. In one long day, we got through most of the work and ended with a stack of empty planter boxes waiting to be filled with soil.  The next weekend we piled them high with dirt and planted our crops. We had a bountiful harvest of fresh veggies – notably a HUGE haul of tomatoes!  A project definitely worth doing and highly rewarding!

You’re working on a boat too! How did you get started on that?

Now, we’ve been focusing on the restoration of our 33′ sailboat.  This project came about when we decided to take a few months off work next summer and go explore the BC coast. We’re going to head for Alaska, but it’s likely we’ll get side-tracked on the way up exploring the Great Bear Rainforest and maybe Haida G’waii.  Since we weren’t in a position to purchase a “ready-to-go” boat, we found one that had everything we were looking for (solid full keel, pilothouse, cutter rig, good engine) but needed a bit of work.

What did that work involve, exactly?

Throughout the summer, we worked away on restoring the hull, scraping and sanding the old failing paint job off the boat, and re-applying a new paint system that should keep the hull protected for another 15 years. The job was totally gross and really dirty but the resulting paint job is fantastic. The VTL was awesome for us. We were regularly in to pick up random tools that we didn’t have on hand: large wrenches for loosening and re-installing thru-hulls, grinders for sharpening scrappers and tidying up teak with stubborn varnish, hole-saws for cleaning up holes that needed filling with fiberglass, various sanders for hard-to-reach places, and additional clamps which were super handy when we were epoxying together the pilothouse roof. As our boat project takes us into winter, it has been great to borrow the work lights to allow us to work into the evenings. Many of the jobs required unique tools that we would probably only use once; the VTL has been a huge help by giving us the opportunity to borrow the tools rather than buy them!

What is still remaining before you go?

The list of ‘to do’ items left for us is mostly made up of cosmetic stuff, including sanding, painting, and varnishing. We’re also in the process of replacing the boat’s pilothouse roof as the previous owner had dropped the boom on it, cracking the fiberglass and leaving a big soggy mess. Besides that, we have some smaller projects inside the boat but nothing that needs immediate attention; we’ll likely pick away at them during the trip. We call it a “project” boat…but we should really be calling it a “projects” boat!

Since there seems to be no end to a project of this nature, we are truly grateful for the VTL shop. Having tools and resources readily available is helping this project go by quicker than expected and making it much easier on our pocketbooks. Your staff and volunteers are always offering encouragement and interest in our work too! Thanks VTL!

Great job Scott and Kim! Have fun on your coastal adventure next summer.

Feature Tool: Pneumatic Finish Nailer

We’re always excited to receive new donations of tools here at the VTL but it was an especially good day when we heard we’d be getting a Porter-Cable Pneumatic Finish Nailer. This had been on our wish list for a while now and we are happy to now be able to offer this to our members!

Photo courtesy of Home Depot

Pneumatic tools use compressed air instead of electricity to produce a mechanical motion. In the case of the finish nailer, the air helps drive a fastener into the material with which you’re working. There are a few advantages to this type of tool over their power tool counterparts:

  • Simple to use and control – they are quite light and lessen the risk of splitting your material;
  • More reliable – they require less maintenance and have longer operating lives; and
  • Safer – these tools do not jam as easily.

Pneumatic finish nailers are used for projects where a hammer just won’t cut it. Sometimes, a hammer is all it takes – I wouldn’t advocate the use of a finish nailer to hang a picture, for example – but a finish nailer is excellent for those projects where one hand is necessary to hold a piece of material in place or the work surface is large. Speed and efficiency is the name of the game with this tool.

With the pneumatic finish nailer, it is easy to set the position of the fastener, control where the fastener goes, and move swiftly. A home project that could’ve taken hours is reduced to a few minutes.

The great thing about the Porter-Cable finish nailer specifically is that it has an adjustable exhaust air vent which allows the user to direct the air away to deflect contaminants. This adds to the safety features of the tool. The nails are easily loaded into the magazine and, unlike some other nailers, it does not require oil for the magazine.

Popular Mechanics has a great run-down of a few different types of finish nailers: Finish Nailer Face-Off: We Test the Top 10 – Popular Mechanics

Here is an informative video from Porter Cable that touches on the mechanics of the nailer: https://www.youtube.com/watch?v=BkghLLWDphE.

If you’ve done a project with a pneumatic finish nailer before, upload your pictures to our Facebook page or tweet it to us.

Feature Member Project: studioCAMP’s ‘Bendch’

Every month, we feature a project created by a different Vancouver Tool Library member. This month, we’re talking to the folks at studioCAMP, who built an incredible public space project through the VIVA Vancouver program this summer. Their bending bench, or ‘Bendch’ as it was known, was a hit in various spaces around the city.

Tell us about the project you built and the process behind it, as well as what inspired you to work on it.

Comprised of Genta Ishimura, Ian Lowrie and Nigel Dembicki, we make up an architectural design collective studioCAMP. We all went through the Environmental Design program at UBC and bonded over our shared interests in architectural design. The Bending Bench was the result of answering a call for proposals from the City of Vancouver’s VIVA Vancouver program, which looks at temporarily turning car oriented spaces into pedestrian oriented spaces over the course of the summer. We built a 37.5 foot bendable bench on wheels that’s divided into ten segments. Each segment has a solid two inch maple slab on top and the siding is made from various wood cuts.

As the VIVA Vancouver program is a temporary summer program, we wanted to create a visually striking and playful social space for people to interact with that they might not normally come across in their day-to-day lives. We also wanted to incorporate as many local and reused materials as possible. The slab came from a Vancouver maple tree that was cut and milled while the siding and frame were mostly scraps we found or had donated to us. From there we looked at interesting design precedents and went to the drawing board, where we drafted iteration after iteration after iteration until we reached something we were satisfied with.

What is your experience with tools? Which tools did you use for this specific project?

All of us have a little knowledge working with tools through a mixture of working various summer jobs and building personal projects. Building the ‘Bendch’ was great as it allowed all of us to learn a little more about using different tools based on our varied skill sets.

For this project we used a brad nail gun w/air compressor, chop saw, table saw, planer, edge planer, cordless drill + bits, clamps, orbital sander, sheet sander, paintbrush, and measuring tape.

Which organizations did you collaborate with on this project and how did they help you?

While we designed and built the Bending Bench, there were many organizations and people that helped in its creation and traveling summer programme. We’d like to give a big thanks to the following organizations for their help and contributions:

VIVA Vancouver: A partner in the project that took on many adminstrative roles.
MODO Car Co-op: A sponsor that gave us free use of a truck to deliver the Bendch to various sites across the city.
Westcoast Wood Slabs: A sponsor that donated the entire length of maple slab top for the Bendch.
The Vancouver Foundation: A non-profit organization that provided us with funding.
David Peacock: A woodworker and friend of studioCAMP that gave us access to a woodwork shop to use its large stationary tools such as the table saw and planer. He also gave us some helpful woodworking tips.
And of course the Vancouver Tool Library: Our primary collaborator and supplier of tools. Going into this project we owned two drills and a couple of hand tools between the three of us. We would have been up the creek without a paddle without you guys!

What was the response from the public after seeing the Bendch in various spaces around Vancouver? Is this something that is likely to be replicated elsewhere?

It was great seeing public response to the project. The Bendch assumed different roles as it moved between sites in Vancouver.

Photos courtesy of studioCAMP

At some sites it was placed in a specific position to become seating for performances such as for a fashion show at Livable Laneways, and for a childrens show and youth taiko drumming at the Powell Street Festival. In the downtown Vancouver Public Library atrium and at the foot of Hornby street between Pender and Hastings in Coal Harbour, the Bendch acted as an interactive piece that people could move and bend at their will. This offered varying ways that the public engaged with it.

We don’t look at this as a project to be directly replicated elsewhere. We see it as part of a larger conversation in finding interesting and beautiful design solutions that enhance a pedestrians daily experience. There’s an unlimited number of options out there. It’s just about getting involved and making things that interest you and hopefully others!

Next project plans?

We like a mixture of office and hands-on work. Currently we are entering a few competitions online and working towards building a lighting prototype. We’re always keeping our eyes open for new projects.

Thanks to Nigel and the team at studioCAMP for letting us feature their great project. Can’t wait to see what you come up with next!

Feature Member Project: Ella’s Kitchen Organizer

Every month, we feature a project created by a different Vancouver Tool Library member. This month, we’re talking to Ella, who fashioned herself a great kitchen organizing unit. While she may have been initially battling ‘stereotypically female’ inhibitions about power tools, she gained confidence through practice and went on to build the project. Read on:

Tell us about the project you built and the process behind it, as well as what inspired you to work on it.

I built a grid of shelves for the kitchen in my friend Devon’s house. I was inspired by the empty wall behind a counter cluttered with spices, oils, and other small jars – items that would fit so pleasantly and accessibly onto shelves, if only they were built. But really, the main inspiration was Devon’s vision for his kitchen and my desire to learn how to build things.

Which tools did you use for the project?

A belt sander, a skill saw, and an impact driver. Impact drivers totally rock. You should get one.

What was your previous experience with tools before this project? Did you experience any challenges?

I hadn’t worked with any of those tools before, and definitely had/have what you could either call ‘a healthy respect for’ or ‘a fear of’ power tools. I was very timid about using the skill saw at first, but luckily I made quite a few mistakes in the cuts and had to redo them, and that led to more practice with the saw. By the end I was feeling almost brazen.

How do you feel now that you’ve completed a project of this nature?

I am unabashedly and disproportionately proud of it. The picture probably looks ok, but it’s really a very simple grid with lots of gaps and uneven edges etc., so, you know, it’s not exactly carpentry art or anything, but I’m still rather tickled with it. And it is sturdy. I’m pretty sure nothing has given way yet and it’s been in use for over a week now. Full points for functionality.

Next project plans?

I should probably take a reasonable next step and maybe build a few more shelves or maybe a bookcase before tackling anything too big, but part of me just wants to strap my baby to my back, grab a chainsaw, and head off into the forest…

Thanks Ella! For years we did not have a chainsaw available for VTL members, but we recently had a small electric one donated. For safe usage and a tutorial on chainsaw kickback, please check out this link submitted by VTL member Dan. Be careful out there folks!!

If you have a project you’d like featured next month, e-mail manager@vancouvertoollibrary.com

Featured Project: Hammock Stand

Who doesn’t wish they could bring a little bit of that tropical vacation back into their living room? One of our member’s thought maybe changing up his furnishings would let him do just that… check out our latest featured project, Ben Taft’s hand-built hammock stand!

VTL: Tell us a little bit about yourself. Are projects like these a hobby for you, or do you work with tools professionally?

Ben: I’m a filmmaker and spend a lot of time travelling or stuck in front of a computer pushing pixels around. Because of this, I felt a need to create something that would exist in a more tangible way for a change, something that could be enjoyed and perhaps last for a long time. Woodworking was the answer to this.

The Stand

The Stand

VTL: Describe your project. What inspired you to build it?

Ben: My girlfriend and I travelled to Honduras a couple of years ago on a whim and enjoyed laying around the hammocks any chance we got. We intended to buy one there but ended up not being able to decide which one to get so we returned empty handed. When we moved into a new place a few months ago, we didn’t really have much furniture so I figured this was a great opportunity to get a hammock. Thus, I turned to one of my favourite sites, Instructables. There, I came upon this detailed guide by user “forke” on how to build a hammock stand. I built the hammock stand’s main beam with a 12 foot 4×4 and stained it, but other than that, it’s very similar to his plans.

VTL: What tools did you need for the job, how long did it take you, level of difficulty to put together?

Ben: It took me about a week worths of evenings, spread out over a month to complete. I haven’t really built anything by myself before, the most difficult part was cutting through the 4x4s at the angles required. I didn’t end up with perfectly even cuts but it all came together anyways. A better understanding of measuring angles, cutting on the outside of the line and a table saw would have helped. I also ended up getting treated wood since that was the only thing available at the Home Depot I went to (a lumber yard would probably have been a better place to source it). This is not really ideal if you, like me, intend to mainly use the stand indoors as it apparently makes staining it more difficult (although, I didn’t have any problem with the stainer I got) and I’m pretty sure the chemicals used aren’t particularly good for you. Specific tools I used were:

  • The Stand in Progress

    The Stand in Progress

    Mitre saw

  • Reciprocating saw
  • Hand sander
  • Power drill
  • 1″ spade bit (slightly larger than the diameter of your lag bolt)
  • a wood drill bit (slightly smaller than the diameter of the threads on your lag bolts)
  • Socket wrench
  • sockets to fit the lag bolt you choose
  • Measuring tape
  • Eye, respirator and hearing protecting gear
  • Paintbrush


VTL: So you got your design plan for the hammock stand from instructables.com. Have you used this page for DIY project before? Would you recommend it as a reliable source for project ideas and instruction?

Ben: I’m a longtime fan of Instructables.com and DIY culture in general. I wrote a stop motion & light painting instructable a few years ago. Although I’ve bookmarked a number of neat projects, this is the first one I’ve actually gone ahead and built. If it hadn’t been for The Vancouver Tool Library, I don’t think I would have done it as I don’t own a lot of tools and to rent them would have been way too expensive for the time period I needed them for. I also greatly benefited from the help and encouragement of the volunteers in the shop who helped me select the right tools. I wish there was also a space for members to work on projects like this, I built this hammock stand in my friend’s garage but now they are using that space for summer so I’m not able to work there anymore.

Lounging in the Hammock

Hammock Lounging!

VTL: If you could hang your hammock one place in the world, where would it be?

Ben: I would love to travel around the world on a boat and hang my hammock from the railings or mast. Or maybe set it up next to a river or waterfall, I love the sound of flowing water, I find it very relaxing and soothing.

VTL: What’s next on your DIY project list?

Ben: I’d love to build a dinner table or desk out of scrap wood, this one is really beautiful.

See more photos of this project, and others, in our Member Projects Album on Facebook!

___________

This post is part of our “Featured Project” series which shines the spotlight on the projects that VTL members are currently working on. We hope it gives you an inside perspective on the many different jobs our tools get used on and provides some inspiration, too!

We’re always looking for more projects to feature, so please get in touch with Caitlin at communications@vancouvertoollibrary.com if you have a project you’d like to tell us about!